
Part 2 of Page Layout:
Understanding Sections in Word™
By Mellissa Ruryk
In our last column, we promised you a series of three columns focused entirely on the mechanical aspects of page layout: how do you make Word™ do what you want?
In the first column, we covered the basics of page layouts – that pages almost always have three elements (margins; headers or footers or both; and the body), and that there are four common combinations of those layout elements to make up a document:
- Simple page layout (headers and footers are the same on all pages of the document)
- Even/odd layout (headers and footers are the same on each odd-numbered page and on each even-numbered page, but not necessarily the same content or alignment in both)
- Different first page layout (a chapter or a section starts where the first page has a different combination of page elements than the rest of the pages in that section
- Complex page layout, which is some combination of two or more of these layouts.
We explained that all page layouts are governed by sections and header/footer settings. That’s the topic of this second column in the series.
Sections
Sections are divisions within a single document. Every document has at least one section (the default), and some documents have dozens of sections. Sections are typically used to mark the end of one style of page layout and begin a new one. Examples might include the front matter of a report or book (no page numbering used), a table of contents, and the main document content (both of which typically begin on page “1”). To make Word properly format each of these sections of your document, you need to create section breaks in your document.
The nomenclature gets difficult here because most technical writers deal with documents that have separate parts – for instance, a report or a manual – called sections, whereas books have chapters. A “chapter” in a book is an easily understood concept for which Word uses “sections”. Please note that in Word, these document divisions do not correspond on a one-to-one basis to the sections of a document. A document’s section (or chapter) in Word can be made up of one or more Word sections. To ensure you, dear reader, do not become confused, I am going to continue to talk about chapters even though you may be creating a report document and not a book. Otherwise, I might have to capitalize ‘Word Section’ to differentiate them from document sections; a danger which may not only become tedious but potentially confusing.
Sections are required for complex layouts. If your document has a complex layout, configure your sections before configuring your headers and footers.
What sections control
Using sections in Word gives technical writers granular control of the following aspects of a document that are separate from other aspects of the document’s look and feel:
- Headers and footers
- Page numbering
- Whether the chapter starts on an odd-numbered page (usually on the right, or “recto” page)
- Page layout (orientation, margins, size)
Headers and footers
All headers and footers are associated with sections.
Headers and footers come in pairs, meaning you never have a header without a footer, and vice versa. Therefore, think of each pair as a “header/footer set.” (However, either one or both of a header/footer set may be blank.)
Every section has at least one header/footer set. As soon as you create a new section, you have created a new header/footer set.
A section can have one, two, or three header/footer sets. The number of header/footer sets is determined by the Different odd and even setting and the Different first page setting. These options appear in the Page Setup dialog box on the Layout tab under Headers and Footers.
The number of header/footer sets in a section is completely independent of the number of header/footer sets in any other section. For example, one section might have a single header/footer set, while the following section can have two header/footer sets because it is intended to be printed double-sided.
Page numbering
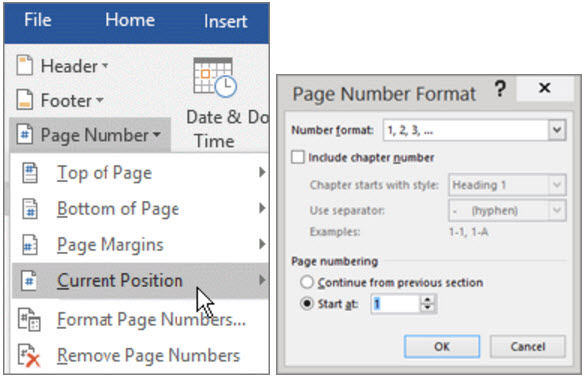 Whether the section starts on an odd-numbered page, every section has its own settings for what type of page the section starts on. The types are:
- New page. Use this setting for single-sided documents. It starts the section on the next page, whether the next page is even- or odd-numbered.
- Odd page. Use this setting for double-sided documents. It automatically inserts a blank page at the end of the previous section, if the previous section has an odd number of pages.
For example, if a section has 9 pages and you insert a section break on the next page, the new section would start on page 10—an even-numbered, left-hand (or verso) page. To prevent this, make the next section start on an Odd page, and Word automatically inserts a blank page 10 when you print the document. - Even page. Don’t use this type of break. It may be useful for mixing landscape pages with portrait ones, but it’s too difficult to set up and maintain to be useful in technical writing.
- New Column and Continuous. Use these types of breaks only for columns, which are harder to maintain and often are not required in technical writing (borderless columns might be easier to use).
Page setup
Page setup includes margin widths or depths, orientation, size, and column layout.
Binding (such as staples, coil rings, and three-ring binders) takes up part of the margins of a document. If you are going to bind a document, adjust the margins to add room for binding.
With a single-sided document, add room for binding by widening the Left margin as follows:
- Do not select Mirror margins from the Multiple pages dropdown list. This
means the Left and Right margins affect odd-numbered and even-numbered
pages the same way. - Increase the Left margin and decrease the Right margin.
With a double-sided document, add room for binding by widening the Inside margin as follows:
- Select Mirror margins from the Multiple pages dropdown list. This changes
Right and Left margins to Inside and Outside margins. - Increase the Inside margin and decrease the Outside margin.
Now the right margin on a left-hand page, and the left margin on a right-hand page, are wider (to allow for binding). The left margin on a left-hand page and the right margin on a right-hand page will be correspondingly narrower.
Where to create sections
Decide on a layout before creating section breaks, because the layout determines the type of section break you need. For example, in a single-sided document, you probably want sections to start on the Next Page. In a double-sided document, you likely want sections to start on an Odd-numbered Page.
You need at least three section breaks in most documents:
- Title page and front matter. The title page and front matter needs its own
section because it
a. has blank headers and footers.
b. is not usually included in the page numbering of the document. - Table of Contents. The table of contents needs its own section because it
a. has Roman page numbering (i, ii, iii) that usually starts at i.
b. starts on an odd page.
c. displays the title of the Table of Contents in the header or footer, not a chapter
title as in the rest of the document. - Body. The body of the document (meaning everything after the Table of Contents) needs its own section because it
a. has Arabic page numbering (1, 2, 3).
b. has page numbering that restarts at 1.
c. starts on an odd page.
d. may display the chapter title in the header or footer.
In addition to the three basic sections, you may want to add other section breaks.
Every section break that you add to a document adds to its complexity. Errors are more likely and changes are harder. It’s a trade-off between complexity and design.
Chapters (a/k/a sections)
You may want a separate section for each chapter, but not as often as you might think. The key issue is your layout.
You do not need a separate section for each chapter to make each chapter start on a new page. If you don’t mind whether chapters start on an odd or even page, you can select the Page break before setting in the style for the heading that starts each chapter (such as Heading 1 or Chapter Heading). Every time you apply the style to a paragraph, it starts a new page. No extra section breaks are required.
You do need a separate section for each chapter for the following layouts, when you want:
- Each chapter to start on an odd-numbered page. Add an Odd Page section break before each chapter.
- Page numbering to restart in each “chapter.” Add a Section break before each chapter.
- Different first page in each chapter. Add a Section break before each chapter
and apply Different First Page formatting.
Special layouts
Other special layouts require using section breaks to include columns and changing the page orientation for landscape pages. These layouts are harder to maintain, but it’s always fun to take on a challenge and succeed!
Where section information is stored
Each section break controls the section formatting of the section before it. Let me just say that again in a slightly different way: The formatting of each section is contained in the section break that follows that section.
This is why people get unexpected results when they delete a section break. When you delete a section break, you delete the section formatting of the section before the break. The section before the break adopts the section formatting of the section after the break.
There is one exception: the last section of the document. The section formatting for the last section is stored in the last paragraph mark of the document. If you were able to go to the end of the document and delete the last paragraph mark, you would delete all your section information, including headers and footers, page numbering, and so on. That’s one of the reasons you can never delete the very last pilcrow in a document.
Tip: In a corrupt document, the last paragraph mark sometimes contains the problem. Try selecting the entire document EXCEPT the last paragraph mark, clicking Ctrl+C to copy it and clicking Ctrl+V to paste the content into a new document.
Next: The Final Column: Creating a complex layout with alternating headers and footers in a document to be printed with a double-sided page layout.